If you will be building this I am sure BR can sell you only the parts you need. They even sell custom size tube to suit. I will be cutting mine in 3 equal pieces.
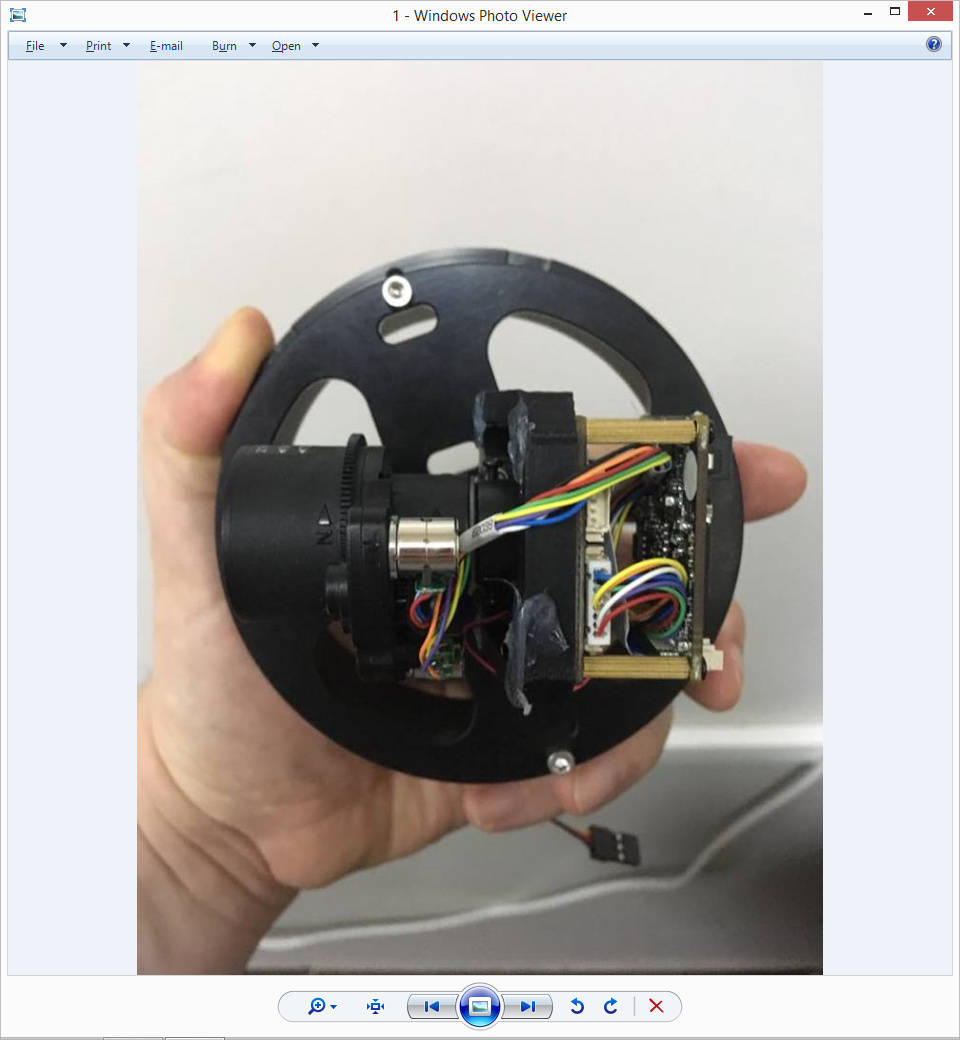
First I had to cut a hole in the tray plate to mount the tilt motor:
I could use wire 7 for a second Tilt Signal and use a 5V regulator hooked on the 12V line. Nothing stoppng you from connecting more than one tilt on the same tilt signal. EX: you are making boom cameras for inspection or you are pairing one with the an aft camera for tether monitoring.
This would allow to use only 1 penetrator on the main BR2 pod for several camera.
You can also apply the same technique on a smaller tube if you are using smaller cameras.
Here are some planned usage for the new camera housing:
I am having a lot of fun with these BR2 projects but I have more critical work to finish. We are building a 2.5T LARS in the shop for a client in France at the moment so BR2 projects are for spare time.
Playing around with the BR2 gave me the perfect excuse to purchase a 3d Printer so you can expect a lot more mods in 2018…
Etienne, I will be interested to see how you get on with this project - primarily because I have been down this road before! Here are some notes from my experience…
I bought a very similar camera from Alibaba about a year ago and it arrived (6 weeks late) with no connection diagrams. We talked to a security cam expert about the wiring and he said that the motor control board was missing and the sensor was definitely fake.
We managed to get the camera running but the quality was appalling - probably about 50% as good as an IP camera that I ripped out of an old bug-eye security camera. Eventually we removed the lens assembly and attached it to a real Sony sensor and the quality was a lot better - but we still couldn’t run the zoom motors.
The refraction through acrylic is not your friend; this is not a problem at full zoom but at wide-angle you will get increasing distortion from the centre of the picture outwards. We built a sled which could vary the distance between the lens and the inside face of the acrylic dome to fix this issue. The problem is, the lenses in these cameras are aspherical therefore there is no ‘sweet spot’ - so some of the picture will always be distorted.
All the same, don’t give up! You may find that the problems described above are acceptable - especially when the ‘pro’ subsea cameras cost 100x the price of your camera. There are also glass tube products that have significantly better refraction, they will always cost more than acrylic but the borosilicates which can now be purchased from China have impressive data sheets and are not too expensive.
The camera I got was shipped and received very quickly.
I got it up and running in no time via internet explorer and its ONVIF compatible.
The camera even does HVEC although I got it set to H.264 for compatibility with my web server.
Is the sensor a rip off? I don’t know, but I find the video quality quite acceptable.
I’ll post screenshots later.
Refraction will be an issue for sure but its the price to pay for a cheap tilt functionality.
There is always the option of installing the camera in a more classic cylinder housing with a proper lens. But this it not essential for me at this point.
The zoom is on plastic gears which are flimsy but for 80USD it is acceptable.
The only issue I had with it so far is the MJPEG has gibberish at the top of the picture. But I don’t use MJPEG.
There is a corrective lens filter (for want of a better term) that is available that corrects for the acrylic tube - I will find the details tomorrow and post them.
Niiice…ive just in the process of ordering a complete lit and parts for this but i qwant low light usb and Analog in the same;).i wirked for Argus remote system and they had cameras like thie;) nice for aft camera too;)
Parts should get here soon so I will be able to update later this week.
I also ordered a couple more cameras, low light and UHD. This time I chose a fish eye lens.
I’ll let you know when they turn up.
I think I will also be adding a piece of plastic to isolate the lens from other light sources. I’ll need the 3d printer for that.
I guess the idea here was just to show how to build a cost effective camera with what was readily available from BR2 but going through the motions made me realize, with a few extra tweaks, this could be a very sensible product.
In the meantime, we went ahead and added the ethernet switch to the BR 4in enclosure.
We also opted to get rid of the female bulkhead and solder network cables directly on the ethernet board. We crimped RJ45 connectors for the fathom-X board and R-Pi and finally spliced cables to tap onto the 5v regulator power.
I find that my camera gives better results in general especially if the BR2 camera is inside its dome.
Also, the good news is, I’ve applied the fix from my thread Get video in Videolan and latency is as good as the BR2 camrea so you can fly with it.
I’ll be cutting the tube today or tomorrow and will post the pictures of the build.
That will conclude this initial goal then I will need to make a bracket that will bring the lens closer to the dome and protect it from surrounding light.
I also bought a couple of cameras I want to tests with fish eye lenses.
Yeah, the web interface allows you to adjust the image settings but the factory defaults are already good. Its a bit on the yellow side but very close to the colors in the office.
Overall the image is sharper and the focus can be adjusted manually.
@etienne - Very nice. I agree that the colors looks good! I’m wondering if you can achieve similar color results by changing any of the settings on the camera page at http://192.168.2.2:2770/camera. The focus and clarity seem to be relatively similar between the two.