I am currently waging war on potted penetrators and replacing them with WetLink penetrators on everything that goes in the water. I have had a number of issues with delamination and leaks. The team at BlueRobotics have been amazing at helping out and replacing components when things go wrong. In my opinion WetLink penetrators are a perfect alternative and there is little excuse not to swap to them.
I would like to share some of my hard won experience in unpotting old cables for reuse without losing too much cable. I have tried everything from grinding penetrators off to swearing at them and I have arrived at a method that works pretty well.
Both grinding and swearing do not work!
Please note that I only really needed to do this on thruster cables. For the rest, cutting through the jacket just above the potting and pulling through the wires works well. On lumen and gripper cables, you are going to need to cut and resolder the connectors anyway.
The solution to easy and clean unpotting is what I suspect is one of the causes of potted penetrators failing, namely heat degradation of the epoxy. The idea is that you heat the epoxy to around 100-150°C for a period of time. This is hot enough to destroy the epoxy but if done correctly does not damage the cable jacket.
To do this you are going to need the following:
- A temperature controlled hot air gun
- A vice of some sort
- Assorted hand tools
- A well ventilated work area (It gets stinky)
- Patience
You could probably get away with a different heat source. I tried a butane torch in the beginning but it is hard to be careful with and you end up with a melted mess like the picture below. A hot hair dryer or paint stripper may do the job.
If I was to do a lot more of these I would repurpose the heating block of a 3D printer for a very controlled heater I could thread the penetrators in to.
Step 0: Calibrate your temperature setting
If you can, find an offcut of the same cable, test at what temperature the outer jacket as well as the inner insulation starts to deform and burn. You don’t want to heat the penetrator past this for long. If you can’t do this, start slow and maybe others can post their findings to help out?
I have found that the thruster cable is much more resilient than the Ping 360 cable for example. Both handle 120°C pretty well, 150°C is pushing it a bit far.
Step 1: Setup
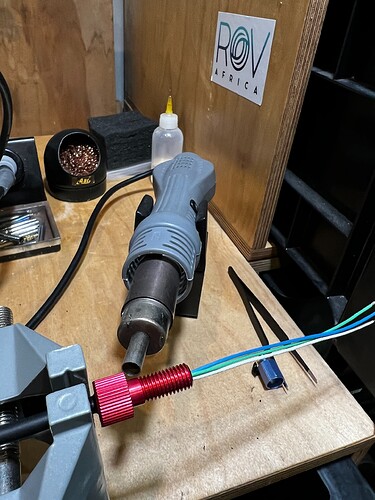
I found the best way to heat up the penetrators is to angle your hot air onto the o-ring grove at the bottom as in the picture below. I am using the medium nozzle on this hot air gun. I thinks this is best because it is not pointing anywhere near the insulation and there is a good amount of heat spreading aluminium.
Once you have set up the work-holding, let it heat up for a few minutes. When I started out, I would rotate the penetrator like cooking a marshmallow, but I don’t think this is required. If you are feeling adventurous, you can crank the heat up for the first few seconds, but see melty picture above as a cautionary tale.
Step 2: Removal
The thing you have to remember for this step is that the penetrator is hot and wants to burn you. Complacency or your innate reflex to catch things that are falling will take you back to the swearing method of removal and this does not work!
From the assorted tools mentioned above find a holdy thing and a pokey thing. Hold the penetrator tightly and test the epoxy with the pokey thing. If the epoxy is easy to stab, pulls away from the aluminium easily and is easy to dig out, your penetrator has been cooked to perfection. If not heat it for a bit longer (5mins) or make it a bit hotter.
A small flat screwdriver or a pair of ESD-13 tweezers are a good pokey thing. If, like me, you chose the closest pair of needle nose pliers as the holdy thing, you are likely to get burned and should consider more suitable pliers.
Dig and lever the epoxy away from the walls and try to remove the plug with a gentle pull. If this does not work, try heating the threaded area a bit more.
If this still does not work try one or a combination of:
- More heating
- Hotter heat
- Gentle pulling
- Epoxy digging
- Twisting and pulling
- More heating
- Less gentle pulling
After you have succeeded you may be left with epoxy attached to the inner insulation. This must go.
Here you have to be patient and can even reheat the epoxy directly to further degrade it. It tends to stick horribly to the insulation and it is very easy to tear the insulation. The idea here is that you remove the cable jacket from just above the epoxy mess, thus losing the least length. You just have to get enough epoxy off that the wires can slide through the jacket. Perfect is the enemy of good enough here.
Good luck!


