Greetings,
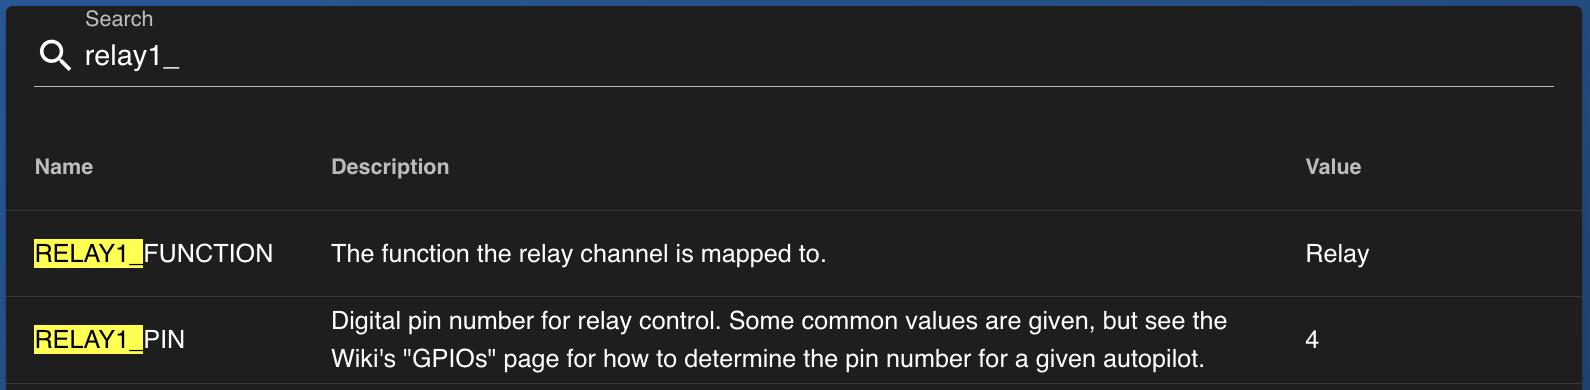
We are trying to add some auxiliary functions on one of our BlueBoats. We wish to be able to turn on/off auxiliary lights and sirens via the joystick controller. I have setup relays and used external switches on other ardupilot boards (pixhawk cube series) with success. The switches I used to use (turnigy receiver control switch) are not available. I was trying to use a 1 channel relay switch (Amazon.com: 1 Channel Relay Shield Module, 10PCS DC 5V Indicator Light LED Module for Arduino R3 MEGA 2560 1280 ARM PIC AVR STM32 Raspberry Pi MCU DSP Official Boards Shield (10PCS) : Electronics), but it is not activating the relay, I can hear it trying to work, and the light changes on the relay board. I was trying to find the Navigator GPIO pins and came across this:
Hi @FairweatherIT -
The first relays you link require way to much drive current for the Navigator to drive! You should have better luck with the second link, as they are solid state. Ive used this option successfully with the Navigator! You’ll need to configure the control channel so it outputs 0 to 3.3V when triggered - see here for more details.
Thanks Tony, I had used the other relays with a Raspberry pi on some other projects, so I had them in the shop. We are wiring up the second kind to see how that goes. Thanks for the link…
Have you tried this using the rover firmware? The switch we have in the shop is exactly like the one you linked to. I tried to follow the instructions in the other thread, but the switch would not work on our Navigator running Rover Stable 4.2.3. There are not options for the relay_1_toggle in the Joystick settings. When I change the firmware to the latest sub version 4.1.1 I can follow the instructions with the exact same setup, and I can get the light to work. I pulled a Turnigy switch off of an old rover in the shop (pixhawk cube black) (before doing so checked to see that it worked), and connected this to the Navigator (back in Rover FW) and I could not get it to turn on lights either. Do you have any recommendations for getting this to work in the Rover firmware?
Hi @FairweatherIT - just jumping in with some clarifications
I just checked the source code, and it seems that support for using the Navigator’s pins as relay outputs was only added in the latest stable (4.4.0). I’ve added that to the guide note.
ArduRover doesn’t use the same type of joystick control as ArduSub, so instead of using the autopilot’s internally registered button functions (via the MANUAL_CONTROL MAVLink message) it’s necessary to send DO_SET_RELAY commands.[1]
Cockpit does not yet have support for generic MAVLink commands, but it is planned. As far as I’m aware QGroundControl doesn’t support that kind of vehicle control, but from the ArduRover docs it seems that MissionPlanner does.
ArduSub will likely end up moving in a similar direction (because in principle an autopilot shouldn’t need to know about or store the specifics of a given input method/device), but for now things are the way they are. ↩︎
What version do you recommend to get relays working on the Navigator?
I really like the Toggle feature (relay_1_toggle) in sub so you do not need to use 2 buttons to turn on/off a switch (light, laser, siren). Is there anyway to make this available in the rover firmware, or put in a request for future versions?
Greetings, I checked this AM and it looks like the Rover 4.4.0 is availible to install on the Navigator in BlueOS. When I run the upgrade and reboot, the firmware says unknown and vehicle says unknown and I cannot connect to QGC or MP by default…
I tried some other tricks, like installing a different vehicle firmware (sub) and then back to Rover, but I get the above screen when installing Rover 4.4.0…Thanks.
Just a FYI, I picked up some of these pololu RC realys and they can be controlled by the Navigator, but requires the use of 2 buttons. One to turn on (pwm 1900) and one to turn off (pwm 900). I would love to get the momentary option that is available on the Sub firmware so only one button could be used.
Cockpit also supports this now through its Actions system, with the extra versatility of being able to implement relative functions (like a “toggle” functionality) by reading the current value and commanding a corresponding state. In addition, the data lake system allows implementing momentary commands by triggering Actions in response to the joystick button being pressed and released
There are some improved Cockpit docs on the way which should clarify some of how that works, so it might be worth waiting for those if you’re not in a rush.
This is also a conceptually simple, yet useful functionality that combines multiple Cockpit features, so I’ll see if I can make an instructive example out of it in the next week or two. That said, in the absence of dedicated instructions for this specific use-case this example should cover most of the main relevant info
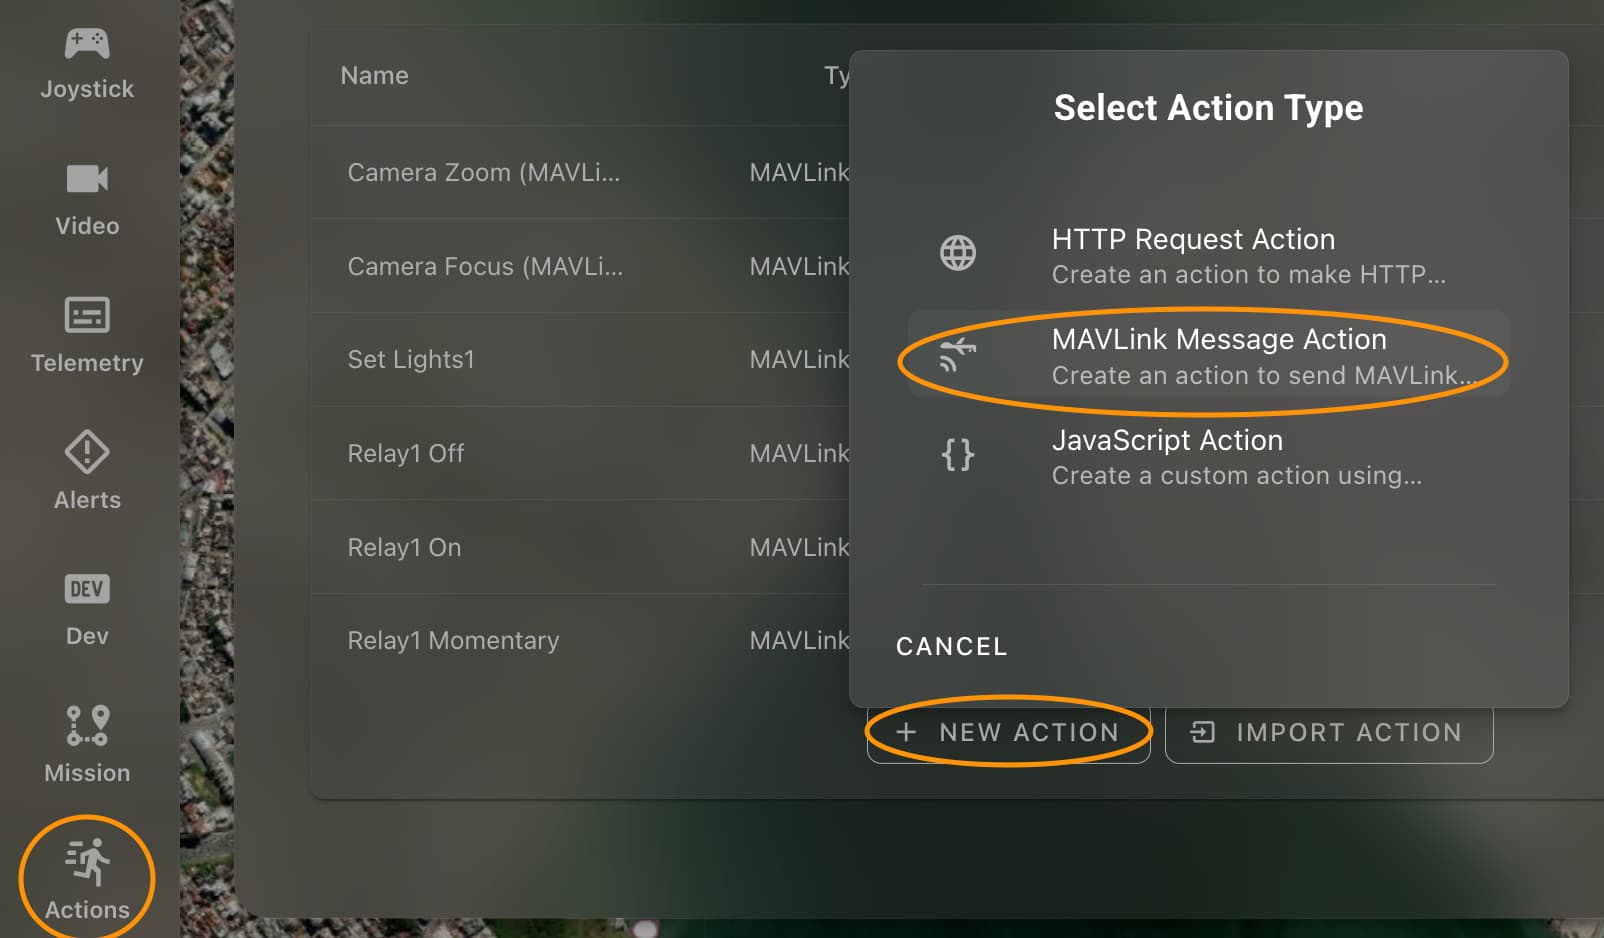
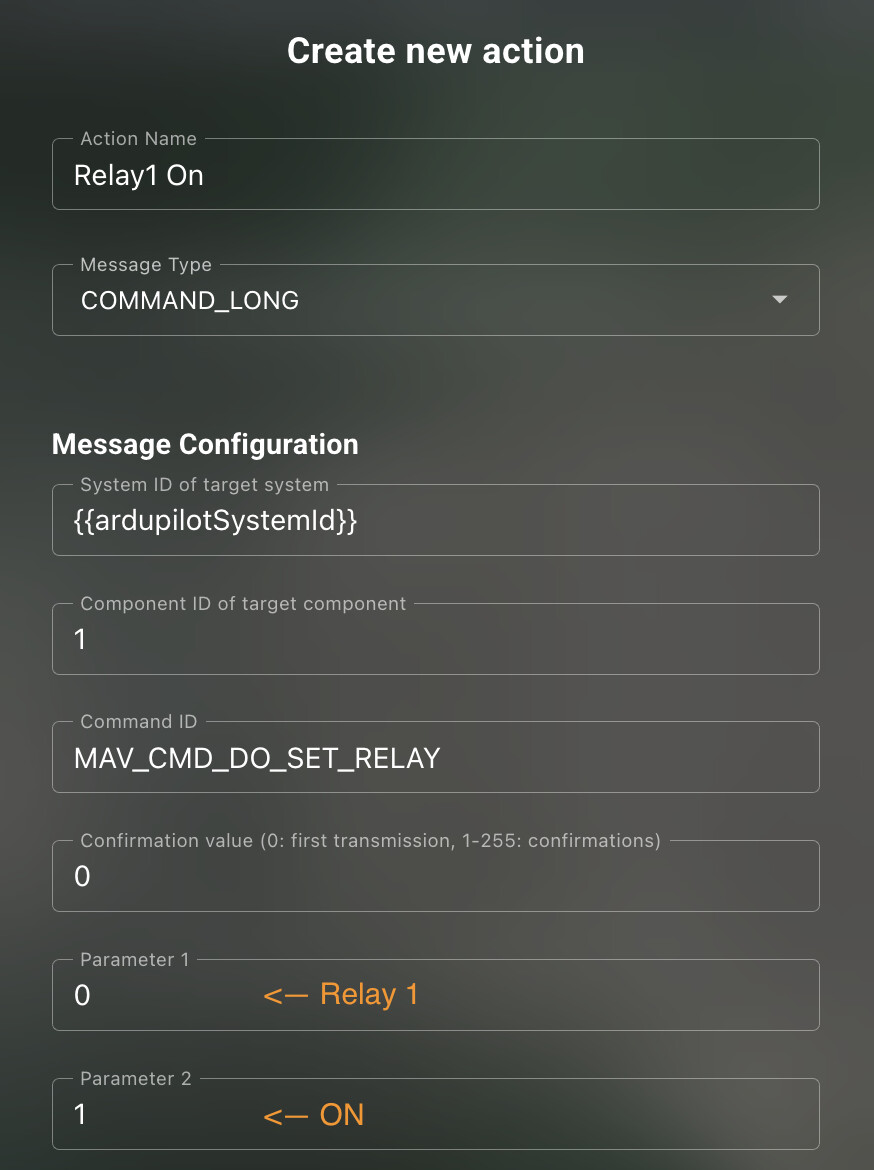
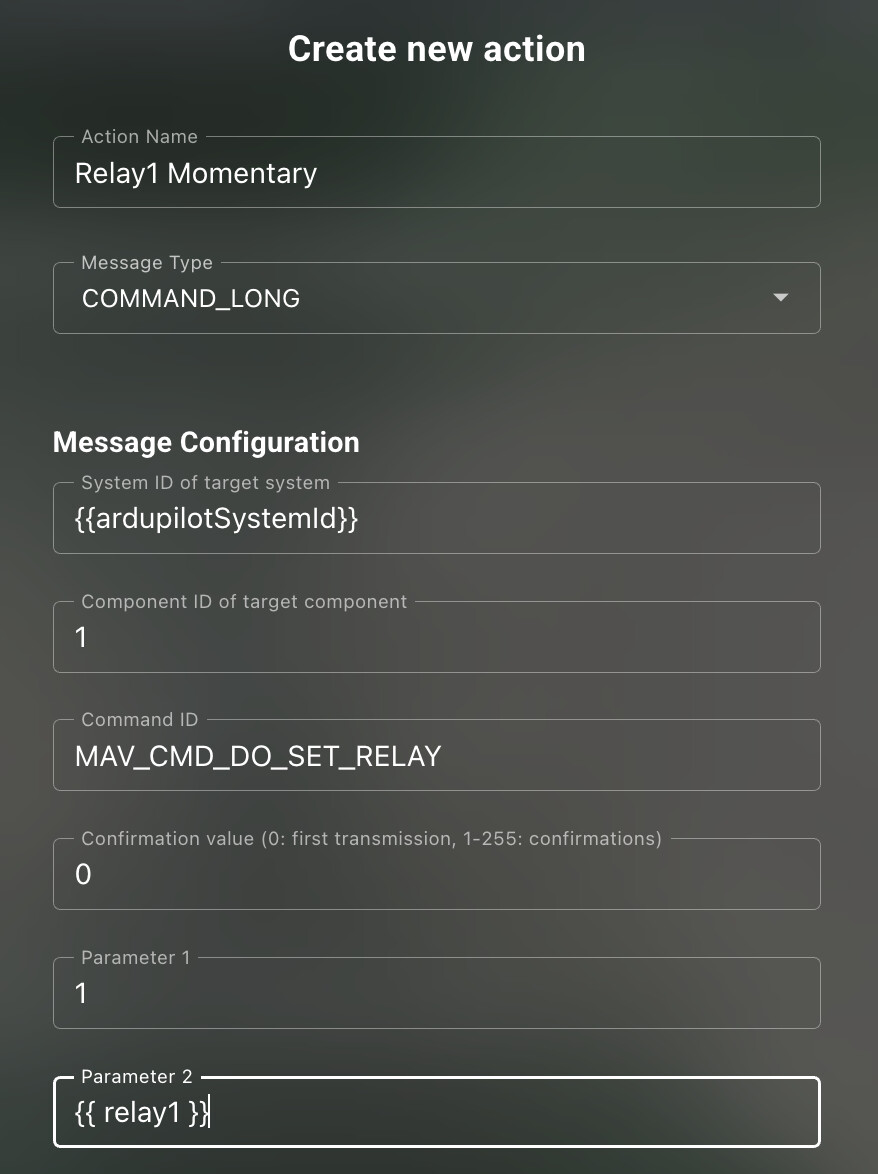
Go to Settings / Actions and set up two separate custom MAVLink message Actions, for on and off MAV_CMD_DO_SET_RELAY commands (using the COMMAND_LONG message type)
Relays in MAVLink are 0-indexed, so Relay 1 is controlled by 0 in parameter 1
The desired state is in parameter 2, and should be 0 for off, and 1 for on
You can press the play buttons in the Actions menu
It may be helpful to set up a plotter widget, with SERVO_OUTPUT_RAW/servo4_raw (or whichever pin you’re using) to see the relay state in real time, especially if you don’t have hardware connected to it
If the Actions aren’t working as expected, you may need to edit them to make sure the parameters are set correctly
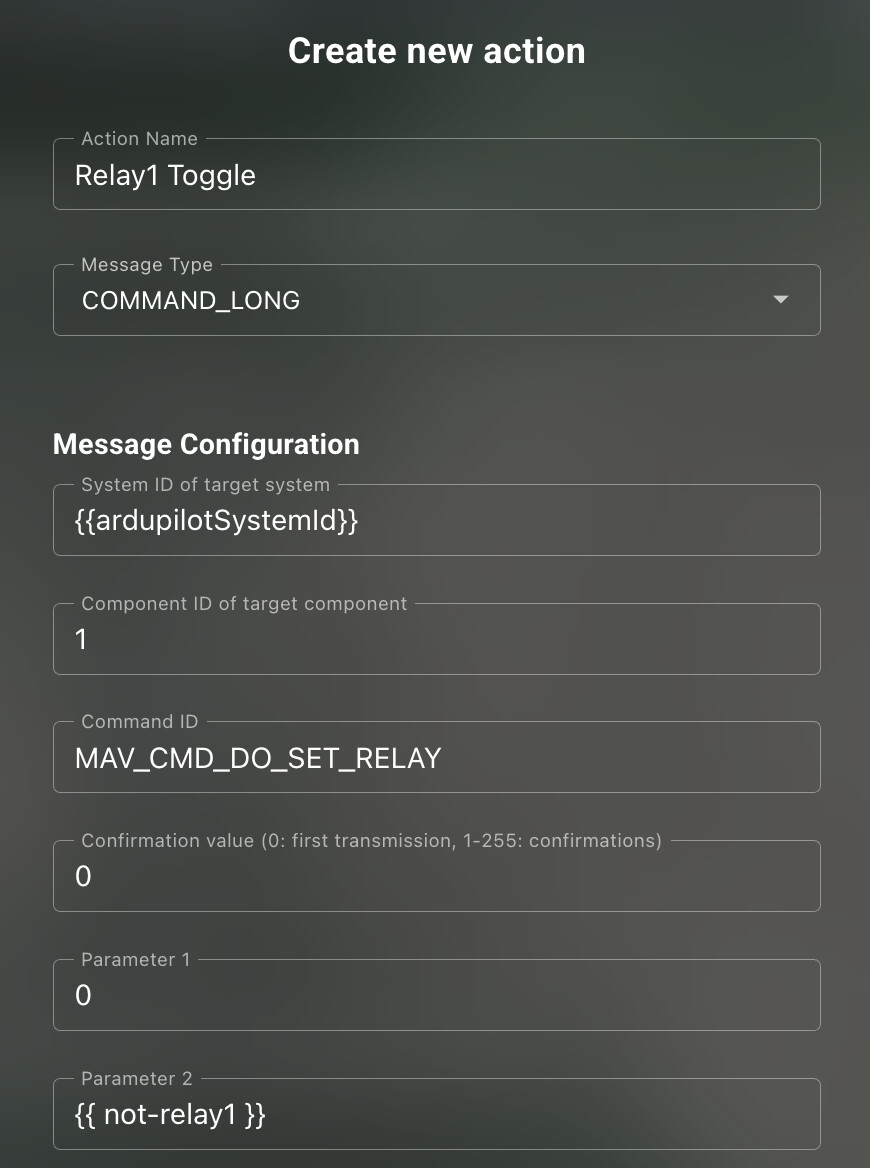
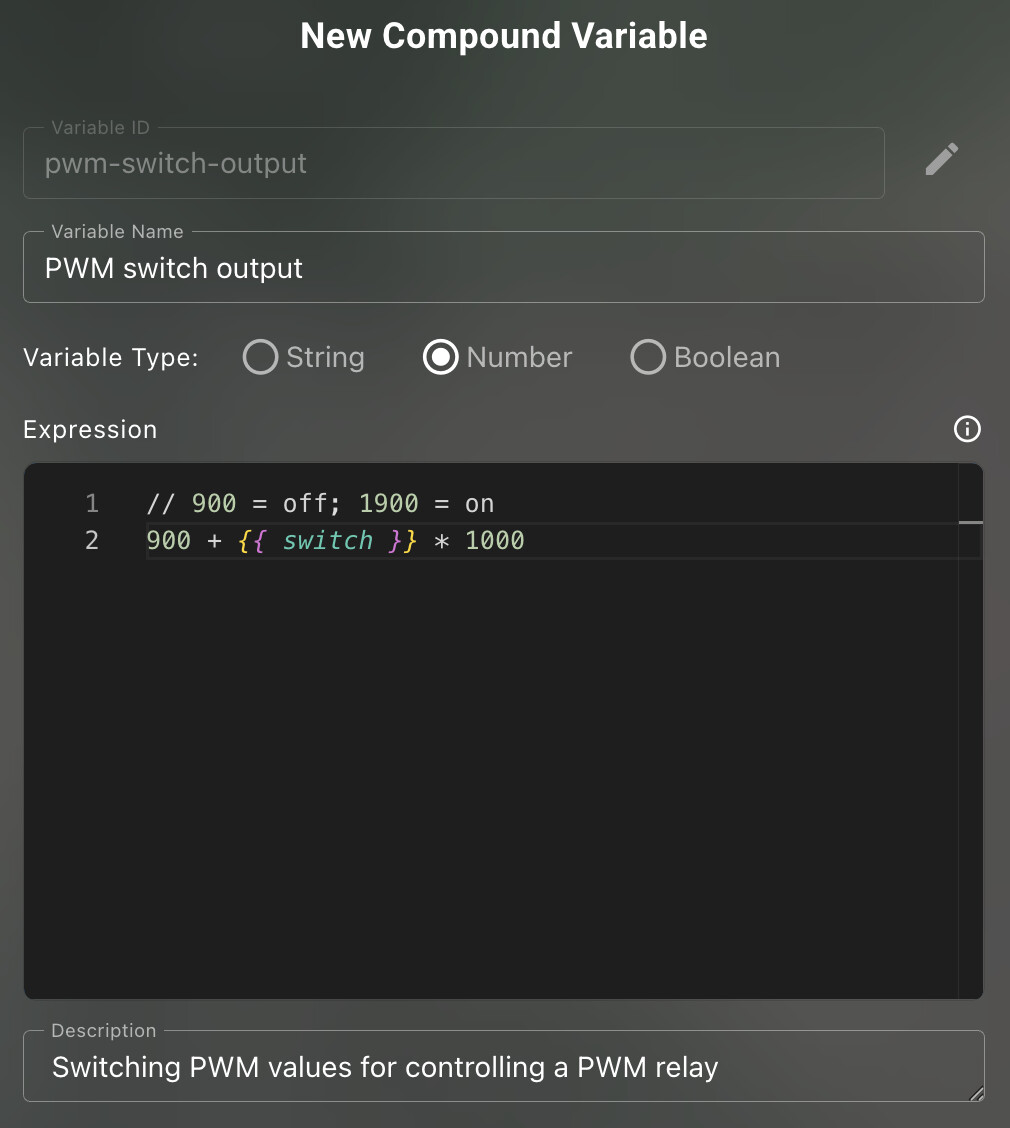
Go to Tools / Data-Lake via the sidebar menu, and create a new compound variable (top right, “Add compound variable”) to invert the reported pin output
0 and 1 can be inverted with an exclusive-OR (xor: ^) operation with 1
MAVLink commands only accept numerical values, so we need the Number type (not boolean)
Create a new DO_SET_RELAY custom MAVLink Action (like in the ON/OFF Control section), but this time set parameter 2 using the new compound variable, so it always inverts the currently reported value
Close the joystick configurator, and test to make sure the functionality works as intended
It may help to set up a plotter widget, with SERVO_OUTPUT_RAW/servo5_raw (or whichever pin you’re using) to see the PWM state in real time, especially if you don’t have hardware connected to it
Hey Eliot! This is a great guide, thank you so much for putting it together! I managed to get this working with a ‘Button’ in Cockpit (v1.16.0) - both having separate On/Off buttons in the UI as well as a single Button that toggles On/Off.
I would like to have the same relay Toggle On/Off working when using a ‘Switch’ in Cockpit instead, as this is visually easier to monitor the state of the relay. I tried this, assigning the Not Relay1 Data Lake variable (same as you created in the Relay Toggle Control section of your guide), but this does not produce any change in the relay output state. Should this work, or is there something I am missing?
Hi @tony-white,
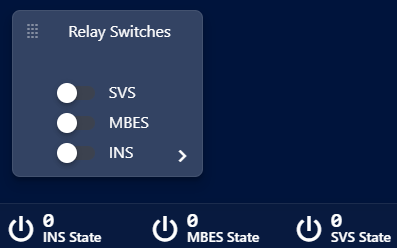
I have set up control of 3 relays (RELAY1/2/3) to be triggered by PWM 9, 10 and 11 respectively. I did this following Eliot’s step-by-step guide above - steps ‘Autopilot Relay Setup’ and ‘Basic Relay ON/OFF Control’. Through this I am able to turn the 3 relays on and off using on-screen buttons in Cockpit.
Since these 3 relays are controlling power to some critical survey sensors (INS, MBES, SV Sensor) I want to have a clear visual indicator from the Cockpit on-screen buttons what the state of each relay is. I therefore followed the steps in the ‘Relay Toggle Control’ section with the hope that I could connect this to an on-screen ‘Switch’ in Cockpit, which would give a clearer indication of whether the relevant relay had been turned on or off.
I was able to connect the Relay1 Toggle (and Relay2 Toggle/Relay3 Toggle) action to a single on-screen button for each relay - allowing each relay to be turned on/off on the same button (as opposed to separate on and off buttons).
I then tried to link the ‘Not Relay1’ Data Lake variable to an on-screen ‘Switch’ (toggle switch giving a better visual indication of the state of the relay command) but this does not produce any change in the relay state (both physically testing the relay device and monitoring the relevant Servo output with the Plotter Widget).
Hope that clears up a bit what I have done so far and what my intended outcome is
This is subtly mixing up two concepts. The input widgets are intended for user inputs, and something configured as an input cannot display the actual status of an output - it can only “monitor” the latest specified input. If things are set up correctly then the output should generally match the latest input (albeit with some latency[1], from communication and processing and the like), but that is not guaranteed (e.g. if there are communication errors, or an invalid configuration).
That may be sufficient for your use-case, but if you need actual output value monitoring (at least to the extent that’s supported by the autopilot - i.e. monitoring the value it’s trying to output), you’ll need to use something like an indicator mini-widget, or a plotter widget, either of which can be connected to a SERVO_OUTPUT_RAW/servoX_raw message field for the relevant pin.
As of Cockpit v1.17 (currently in beta) you can use string values in Very Generic Indicators, in which case you could create a compound variable with emojis to make a status indicator that looks like a checkbox (e.g. Relay 1 String Status set to {{ SERVO_OUTPUT_RAW/servo10_raw }} ? ✅ : ❌) , if you want:
This type of connection shouldn’t be allowed, so I can understand why you’re confused about how it is/isn’t working given it’s letting you make the connection. I’ve just raised that as a bug
Status monitoring aside, if you want to control a relay with a switch or checkbox then you’ll want to:
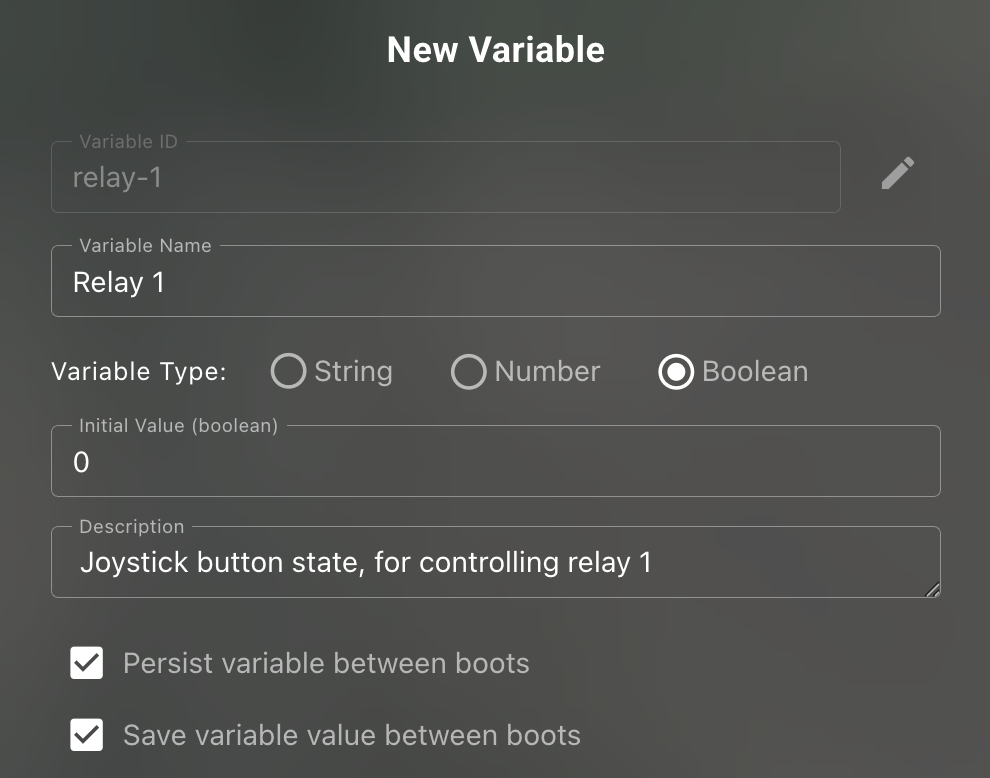
Create the component
Create a data-lake variable via the widget configuration
Call it something relevant, like relay1
Create a compound data-lake variable to convert it to a number, so it can be used directly in a MAVLink message
e.g. it could be defined as Number({{ relay1 }})
Its variable type should be set to Number
Its name could be something like Relay1 MAV
Create a MAV_CMD_DO_SET_RELAY Action for controlling the relay
You could call it something like Control Relay1
Remember that the command uses zero-based indexing for the relay number (e.g. param1 = 0 controls relay 1)
The value (param2) should be your numerical variable (e.g. {{ relay1-mav }})
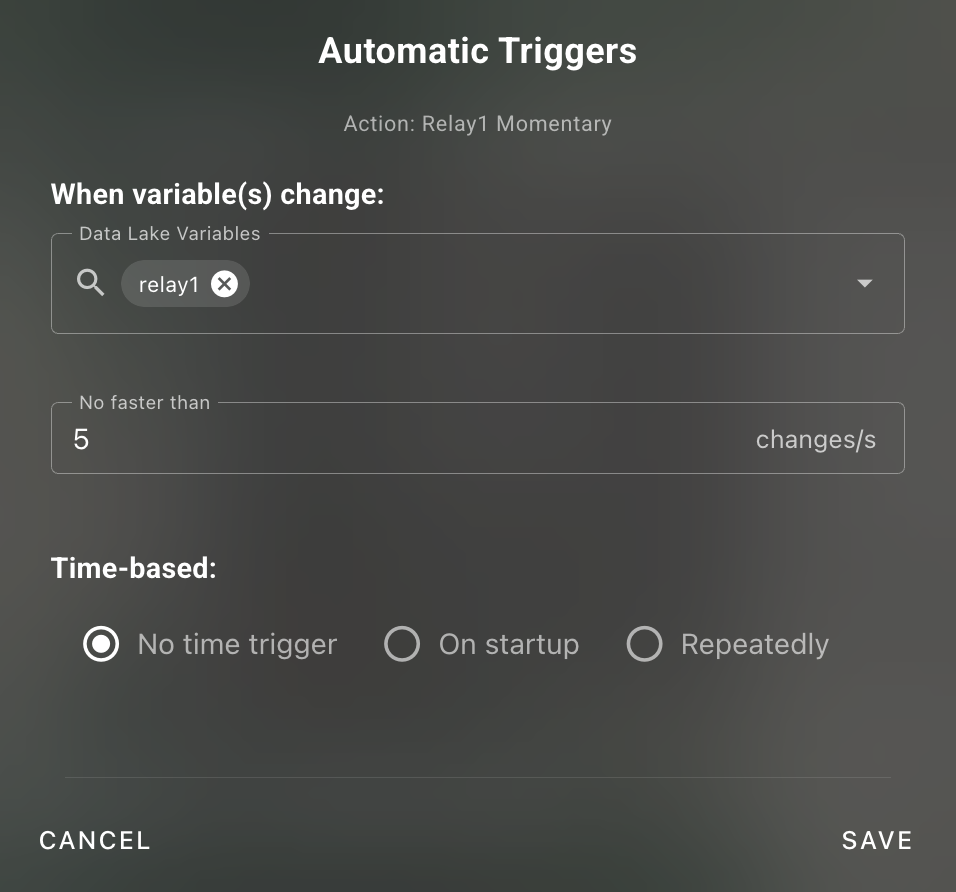
It should be triggered by the same variable
Confirm it’s working as expected (e.g. with a plotter/indicator of the servo output, and/or electrically at the output)
You can somewhat visualise this, by making separate plots for the commanded value and the reported value. For precise values you can record the screen to see how much lag there is when you make a change, noting that the communication delay is doubled from the actual timing, because it has to get back to you from the vehicle after the change has happened. ↩︎
Thanks for your response and detailed information, it is greatly appreciated!
I must admit I am just starting to dive into all of this so there are a few assumptions I made initially which were clearly incorrect.
I have now setup control of my relays through on-screen switches in Cockpit from your instructions and that works perfectly! I also set up indicator mini widgets to monitor the state (at least what its trying to output - either 1 [on] or 0 [off]) for each relay and that also works great. So I now have a good visual idea both from the switches and the indicator widgets whether the relays have been turned on or off. Exactly what I was after!
I have not tried your suggestion in Cockpit v1.17 using a compound variable to display different emojis for different output states, but will look into this in the future.