Hey guys, just wanted to show off my build so far and hopefully get some feedback from an experienced community. I had been wanting to build a rov since I was a kid and decided as an adult with the funds and technical expertise now is the time. I wanted to do a frame based on 8020 extruded aluminum. The idea is that it would be easy to shift components around and be a somewhat modular platform. Drew a quick frame up in Maytech and it generated a nice bom.

I drew up and 3d printed various brackets that help attach components such as lights/thrusters. I got these thrusters for very cheap on Amazon. I’m skeptical of their performance (I took one apart and there was a dji brand motor inside) but don’t have the budget for decent thrusters for now. Opting for a 6 motor thrust vectored layout. (Had to split this into separate posts as new users can only post one image per post for some reason?)

Currently in the process of building a 39 cell battery out of 18650s recycled from old modem batteries. Each cell was discharged and tested for internal resistance and capacity. Hoping to have around 26AH of capacity at 11 volts. I wrote a small python script to sort the pack into a 3s13p balancing the 3 parallels packs so they all have the same capacity. I then designed a housing so they all fit safely inside a 4 inch blue robotics housing.


Welcome to the forum Josh - cool build! ![]()
Is your intention for the profiles to be water-filled or sealed? Curious what the difference in buoyancy would be and whether it’s significant. I’d recommend choosing one and either drilling several small drainage holes or sealing off the access points so you avoid a mix of water and air sloshing around, but not sure how much effect it would have either way.
Neat idea, nice!
Interested in the battery pack, if you don’t mind sharing extra details ![]()
What material have you printed the housing out of, and how are you setting up/connecting the conductors between the batteries?
Also curious about how you’re planning to charge the batteries. Have you got a charger that can balance all 13 cells at once?
Your designed housing looks solid, and the aluminium enclosure should help keep things cool ![]()
Sorry its been a minute. Just finished up the battery recently. Housing is printed out of PLA, Using a hx-3s-fl25a to charge/balance the pack. The battery is in a 3s13p configuration. Since its 3 groups of 13 cells in parallel we only need to balance the 3 “groups” of batteries to match each others voltage. Pulled some inspiration from how tesla builds their vehicle batteries for added safety. Each 18650 is connected to a bus bar with thin nichrome wire. This acts as a fuse isolating problematic cells without compromising pack integrity. Seems to work great so far but have yet to put a real load on it. One thing is for certain, I don’t think it would make it through airport security ![]() . Hoping to finish final assembly in the next few weeks and do a first dive before 2022!
. Hoping to finish final assembly in the next few weeks and do a first dive before 2022!


I built an 8020 main structure for exactly those reasons as well. I drilled drain holes in it to help with the concern that @EliotBR brought up
That is awesome! Yea it is a huge oversight on my part and I’m glad @EliotBR brought it up. I just recently had the idea of filling the top railings with expanding foam then drilling holes in the bottom part for drains. Any thoughts on this? I don’t have anything in mind for making the ROV neutrally buoyant yet.
Thank you guys for the ideas.
Without looking into it, maybe check that the expanding foam doesn’t degrade too much in salt water?
For the drainage holes remember that air in water wants to go up, but water in air wants to go down, so you may need vertical holes that go all the way through (or perhaps some on top and some from beneath if there are strength concerns from too much cross-section reduction).

This is awesome. Do you have any more pictures of your build?
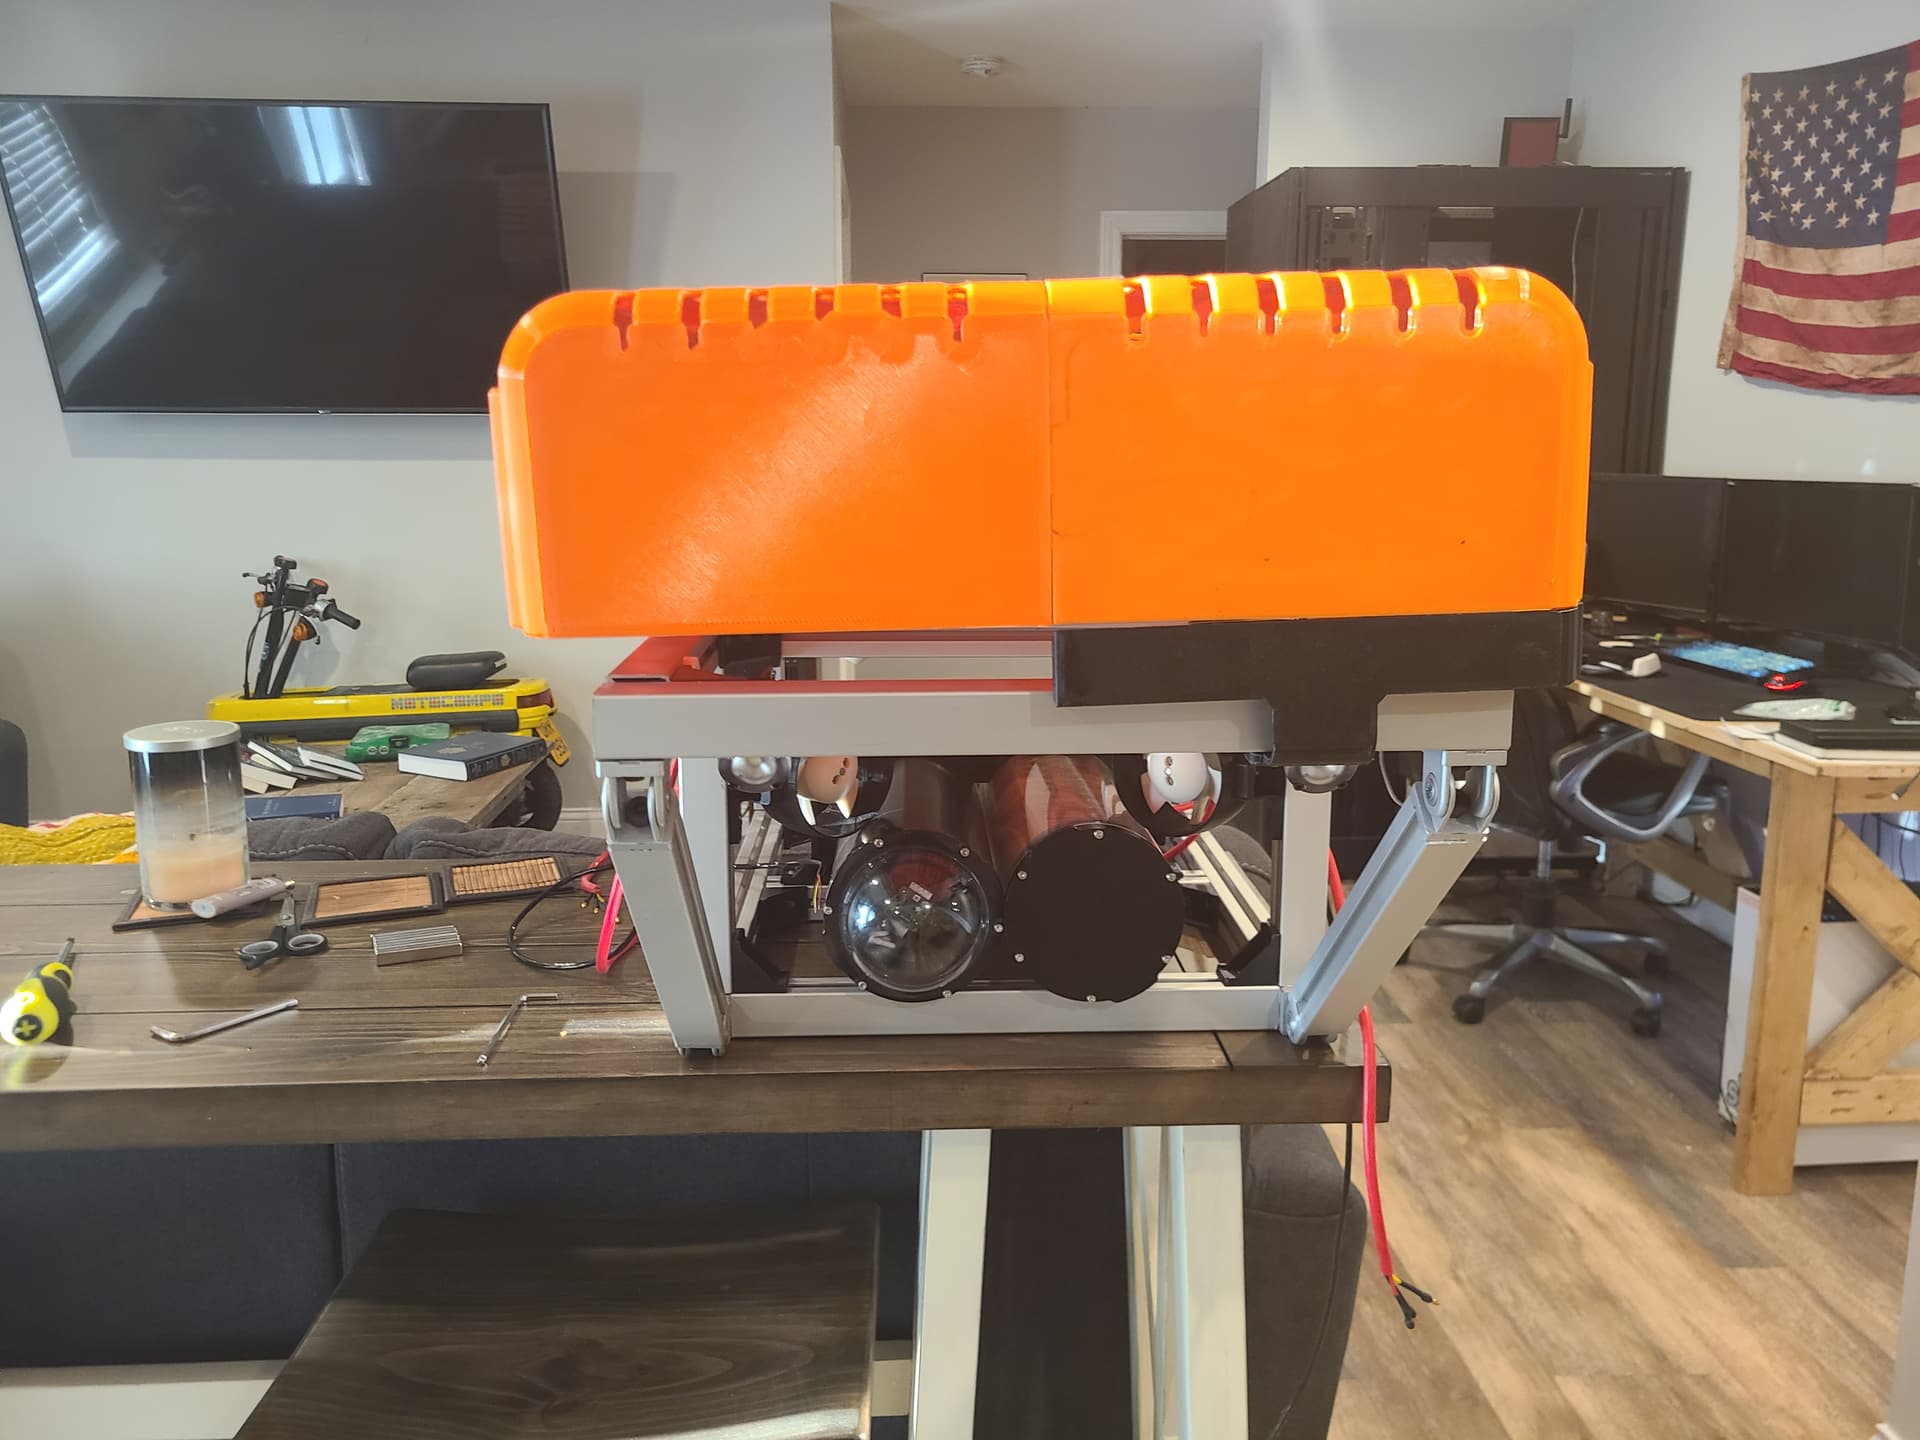
Been busy the past few weeks working on ballast calculations and designing a cover to give the rov a cleaner look. The orange part will connect to the black lower brackets via magnets to provide easy access to that area. The cover was designed by a friend, his art station can be found here: https://rhen.artstation.com/. I also drew up a bracket for mounting the battery and camera housings in fusion360. All of these parts are printed at 100% infill at .2mm layer height. For the orange cover pieces I think I’m going to switch to a 1mm nozzle to speed up print time. As they are now it takes 4.5 days to print one (4 total). This will be 300+ hours of print time at a .2mm layer height. Increasing the nozzle size should cut this time in half. The first attempt failed with only 10 layers left ![]() . I think it can still be salvaged.
. I think it can still be salvaged.


Cool to see the latest progress on this ![]()
New cover is looking slick! Well done to your friend.
Yeah, bigger nozzle is definitely a good idea with large parts, especially where fine details aren’t super important. If you’ve got the heating capacity (and suitable other components) for it it might even be worth going up to 2.85mm filament ![]()
Am I correct in assuming the orange covers are being printed with the small face down?
I expect the black mounting bracket could have had some more holes in it to reduce print time and material, but I suppose that one you only need to print once so it’s a bit less important to make those optimisations.
Yep the smooth front face is facing the print bed. Quick update, got the covers screwed together and quick test fit with 2 of the side brackets printed. About 350 hours of printing so far. Feels like my printer has been running non stop the past month lol. Still have 2 more side brackets to print but its coming along! The cover will get a coat of resin and the seams epoxied together. Next step is building the ballast system and designing brackets for those. It is a little bigger than I expected haha.


Great work! A very sturdy looking design. You’ll likely want some buoyancy foam that doesn’t compress with pressure before your first dive!
Totally agree. And its on the list of priorities but syntactic foam is expensive ![]() . Pool noodles will have to do for now. Obviously restricted to shallow dives but I am curious to their practical depth rating. The original design had some PVC pontoons for buoyancy but with them it put the whole craft to well over 50lbs.
. Pool noodles will have to do for now. Obviously restricted to shallow dives but I am curious to their practical depth rating. The original design had some PVC pontoons for buoyancy but with them it put the whole craft to well over 50lbs.
Off topic but I believe I have found a budget fiber tether solution. Looking forward to testing a sub $300 fiber optic tether and media converters in the near future.
Where in the world have you found a $300 fiber tether solution? Can you please provide a link?
Cheers
https://www.amazon.com/gp/product/B0BBZZBMN5/ref=ox_sc_act_title_2?smid=A6DEG5PBWT4AK&th=1 Stainless steel wrapped in kevlar optic cable. In theory should be plenty durable. And https://www.amazon.com/gp/product/B0BHQXY3NJ/ref=ox_sc_act_title_1?smid=A2R8IO4HQL285O&psc=1 for the media converters. Single mode fiber so distance shouldn’t be an issue. The big problem though is re-terminating the connector as it most definitely won’t fit through a penetrator. Quick research shows this is possible without expensive gear but I have not read much past some quick google searches.
Hi @buckarooooo -
Great find! I would definitely test with the original terminations before cutting the connector off to fit it through the penetrator. Let us know how it goes, especially the process of splicing it back together!