As ROV component prices continue to go up due to an industry perceived need to go deeper and become more “rugged” (BR WTE’s for example), they have become unjustifiable for, and not necessary for, a less than 100-foot depth requirement (which realistically covers probably 80% of all ROV use, including commercial), it is important that we hobbyist/amateurs who love to work in the underwater world put our heads together for designing and building less expensive components that meet the more realistic needs of the majority of our community. I am setting a goal right now to develop a 4-inch diameter WTE that is useable to at least 100 feet, including end caps, for $100. I already know that flanged ends with gaskets on PVC pipe will meet the depth requirement, but I have found that a minimum of 16 bolts are required to prevent leakage, and that is too much hassle for portability and use away from the home shop. I have some ideas to get around this problem and I will share them here as they are developed. I am hoping DIY’ers and the BR team will help me pursue this goal for everyone’s benefit.
Richard
Hi Richard!
It hurts a little to read this because I feel your pain as a hobbyist and also know why our enclosures had to get more expensive. It’s always tough balancing cost versus performance! I know you’re not really asking, but I feel compelled to discuss why. There are a lot of reasons, but here are the highlights of why the new enclosures are a little more expensive:
- The raw materials have gone up a ton. When we first started selling acrylic tubes, a 4" tube, 12" long, was about $22 from ePlastics (which is where we originally bought them). They’re over $60 now just for the tube itself.
- It’s a really hard to make an enclosure that can be consistently produced with stock materials without post-machining because the tolerances are pretty large and quickly go outside of what your flange/O-ring are designed for. This happened a lot to us and we had to scrap a lot of tubes over the years!
- The new features (locking cord, anti-rotation, machined ends) do increase the costs but they’re also things that customers consistently asked for so we felt it was important to address. A lot of people were frustrated with the limitations and inconsistency of the original design.
I think it’s important to note, the increased depth ratings don’t actually cost anything! That’s more about designing the tube thicknesses properly and being able to test them!
If I was designing an enclosure to be low-cost, I’d probably do the following things:
- Use O-rings! O-rings work really well and they are cheap.
- Use a fairly large cross section O-ring, which can handle loose tolerances better.
- Use a commonly available tube like PVC
- I’d still use our tube/flange/end-cap configuration because it works well and it’s really flexible
What tools do you have available to use for this?
I hope this answer is helpful and I’m excited to see what comes of this thread!
-Rusty
Rusty, as always from you, an understanding and well thought out reply to presented problems. Thanks.
You and Elliot sure work late ![]() Answering my post must have been about midnight your time.
Answering my post must have been about midnight your time.
Pretty standard home shop tools. Power tools include a 3/8" drill press. miter saw, belt sander, Dremel tool, and jig saw. Normal stuff.
I have been designing an AUV for a little while now. The biggest problem is that the vehicle I have had in mind is very reliant on computer vision for navigation and decision-making. Naturally I gravitated towards NVIDIA’s Jetson lineup, and have had to contend with how best to enclose such large and awkward boards in a watertight package.
I’ve been incubating a couple possible solutions: spheres, and mineral oil.
Creating a spherical housing, notionally, would involve buying a pair of acrylic hemispheres, use silicon sealant for the flanges, and very carefully drill holes for Cobalt or WetLink connectors. If that fails, or they prove unable to hold the pressure, I could always buy two sizes of hemisphere, and use acrylic resin to cast a hemisphere that is thicker. No telling about the pressure rating. I remember it having been suggested on another forum that a spherical enclosure of a same size, material and thickness should generally hold twice what a cylinder would.
The alternative was, with sufficient secondary buoyancy, pressure compensation. Take something watertight but slightly flexible, put the electronics inside, and fill with mineral oil. The pressure is transferred to everything inside while protecting it from the water. Could be as simple as a glass freezer container with a plastic lid; something meant to hold soup. I know that, at some depth, components like batteries and capacitors would not hold up to the pressure. I remember reading on a Reddit forum that one guy had tested crystal oscillators to 300 meters before they failed. So, I feel some confidence that they will hold to 30 meters.
For a test in a pool I used small plastic enclosures and filled them with cheap food oil (sunflower).
The enclosures where filled with oil for about 1.5 months and held a Fathom X module and Wago 211 connectors and a RJ45 connector to connect the SubConn Ethernet cable to the Fathom X module and the tether that also supplied power on the spare wire pairs.
While preparing for a test in the sea I went with bigger enclosures to compensate for the need for more electronics included in the enclosure (RPi4 and step down converter).
The enclosure sealed good enough but the clear lid became brittle and broke near the screw holes, resulting in leaks. However I could have “sacrificed” the enclosure and epoxied the lid to the enclosure (or securing the lid to the enclosure in other ways) and it should have worked.
The lid was slightly flexible, and you could see it bend inwards during vacuum testing the enclosure.
Test rig with two small enclosures:

Vacuum testing bigger enclosure (without oil filled):

Bigger enclosure filled with food oil (air not completely bled out in this photo):

I intend to use multiple Luxonis OAK-D depth AI cameras in the prototype I have been working on. These include built in Myriad-X chips for on-device compute of ML models. I plan to cast the cameras in resin to watertight them. In addition I plan to design/build a PCB to integrate RPi4 compute module(s) and SSD(s) to control other aspects of the drone.
I’m also considering building an oil filled rigid enclosure for a DIY pouch cell based battery. The enclosure can then be pressure compensated through an external tube or by including an open area in the rigid enclosure and a flexible membrane.(but this most likely adds unneeded complexity).
Derek, a spherical enclosure in an external pressure environment is only subject to compressive forces. Whereas the cylinder is subject to a complex force made up of tensile and compressive forces combined. Necessarily the spherical model will greatly outperform the cylinder. That being said, four simple longitudinal frames spaced at 90 degrees will greatly increase the cylinders depth rating.
I like the idea of using flexible non-cylindrical enclosure shapes filled with a non-compressible fluid as a means of economically increasing depth capability and being able to hold larger components than would be practicable with a cylindrical shape. The typical ROV moves at slow enough speed through the water that resistance/drag is not of big concern.
A downside to using oil immersion is it may be pretty much a permanent situation. Component changes will be difficult without complete removal of oil residue.
I may give serious thought to this concept for my next generation ROV. My current project is almost complete so I’m not too far out from doing that. Unfortunately, I am only working in shallow, freshwater lakes, so my experience may not map well to the deep saltwater environment.
On my current project, I am mitigating the downside somewhat of using flanged end caps by being able to charge the internal 2S battery from an external plug. I have an XT-60 plug running through a BR penetrator that I use for charging. The lake water conductivity is so low it does not short circuit the connection. I have been doing this with underwater drop lights for a long time. Because I can’t balance charge, and because I want to keep heat buildup to a minimum, I charge at only one amp.

This represents the most barebones, least cost approach to a WTE. It can probably handle 30m depth, or more. I have only tested to 50 ft so far, since that is my target working depth in the lakes here.
It is inexpensive, easy to construct and gets the job done. Total cost about $40.
The downside is the hassle of 16 bolts! For freshwater you don’t have to take off the end plate to charge the battery (previous post). I haven’t impact tested the epoxy joint between the PVC and the plexiglass, and I don’t know the long-term effects from UV exposure. I have tried using just 8 bolts, and it leaks. Thicker plexiglass would probably allow 8 bolts to work but it is 3 times the cost of 1/4" ($24 vs $9 for a 6x6 plate). Any ideas/suggestions would be appreciated.
Richard


Another option to reduce disassembly time and probably improve depth capability, is to machine an O-ring groove in the outer plate, which may also allow getting away with fewer bolts. Elliot may have some input on that helping. Of course, there is an added cost to doing that, which the goal is to avoid where possible.
Nice, Richard. I’m glad it’s working! I agree that an O-ring (face seal) machined into one of the plates would be very effective and would reduce the number of bolts that are needed, but of course it would be more difficult to make.
What type of gasket material are you using? I’m not an expert with using gaskets, but would think that a softer material might work with fewer bolts.
-Rusty
I initially used 1/16th neoprene rubber. It didn’t work well. I changed to a softer, thicker material (I didn’t write down the name and can’t remember!) that works much better. The epoxy has pretty good shear strength, but I am concerned about smacking a rock into the flange edge and having joint failure. Right before I end the life of this version, I will see what it takes to break the joint.
Thanks for the reply.
I misspoke on the cost of 1/2" plexiglass plate. The 6x6x1/4 is $10, the 1/2" is $15. So, $10 more to eliminate 8 of the bolts. Probably worth it. Sawing the 3-1/2" hole through 1/2" plexiglass presents a problem. You really have to take it in short steps, letting the saw blade cool between steps or it will melt the glass.
Hi @model14
If you have access to a laser cutter you should really take a look at the way the endcaps were made on the old OpenROV kits. They were laminates of laser-cut acrylic bonded together, with the laminates sized correctly to make a piston seal O-ring groove directly in the endcap. It looks like you’re using Schedule 40 PVC for your projects- once you design a good endcap for a particular size of PVC tube, then banging out additional endcaps on a laser cutter is a quick process.
Walt, I’ll certainly look into that. I think I may know someone, who knows someone, with a laser cutter I might be able to use at low or no cost. Thank you for the suggestion.
Richard
Note that reducing the diameter of the flange reduces both the likelihood of such a collision, and the bending forces if one occurs. That may make it a bit more challenging to fit the bolts in, but is perhaps worth considering as an option.
I haven’t worked with PVC before, but looking at a sizing chart it seems like 3 1/2" schedule 40 pipe would generally fit inside 4" schedule 40 pipe (although it may be a squeeze). I’m curious whether it would be possible to make something like a flange cap with some 3 1/2" pipe bonded to a plate. By chamfering the inside edge of the 4" pipe it may be possible to have an o-ring in the corner, which avoids more complex machining or assembly operations while still providing a seal:

If additional holding force is required it may also be possible to drill some holes in the end of the pipe walls to inset some nuts into and screw into through the plate:

That said, I’m hopeful that that would be unnecessary complexity since the force from the pressure on the outer face would be much larger than the force on the o-ring, and should push the flange into place.
Elliot, his article (see Ikelite hatch closure) implies I can eliminate the bevel. That would eliminate a machining process.
Waterproofing – Key To Underwater Photography | Pevly
I think you’ve headed me in a fruitful direction. This has to take a backseat for a little bit while I finish my current project.
Richard
If the fit between the tubes is quite tight then it’s likely ok to skip a bevel, but if there’s a a gap then with no bevel or chamfer I’d be concerned about potentially rupturing the o-ring as it gets forced over the 90 degree edge.
It’s possible to make a chamfer by hand with a file / some sandpaper / a knife / … , although I’m unsure how challenging it would be to get a smooth finish on PVC without a chemical abrasive or filler (as mentioned - I haven’t worked with it before).
Less work is of course preferable where possible, so it presumably makes sense to check the tolerance of the fit before making a more educated decision on whether softening the edge would be helpful.
Hopefully that proves to be the case ![]()
Fair enough. As usual, interesting ideas are plentiful but time is not so much.
Well, what I was concerned about with the flanged endcap has happened! Cracks developed at 2 of the bolt holes, between the hole and the outer edge, possibly due to impact or maybe overtightening. I have no choice now but to try a different end cap setup as discussed in the last post. With the BR enclosure now over $400, I am still motivated to try plan B, as discussed in the last post.
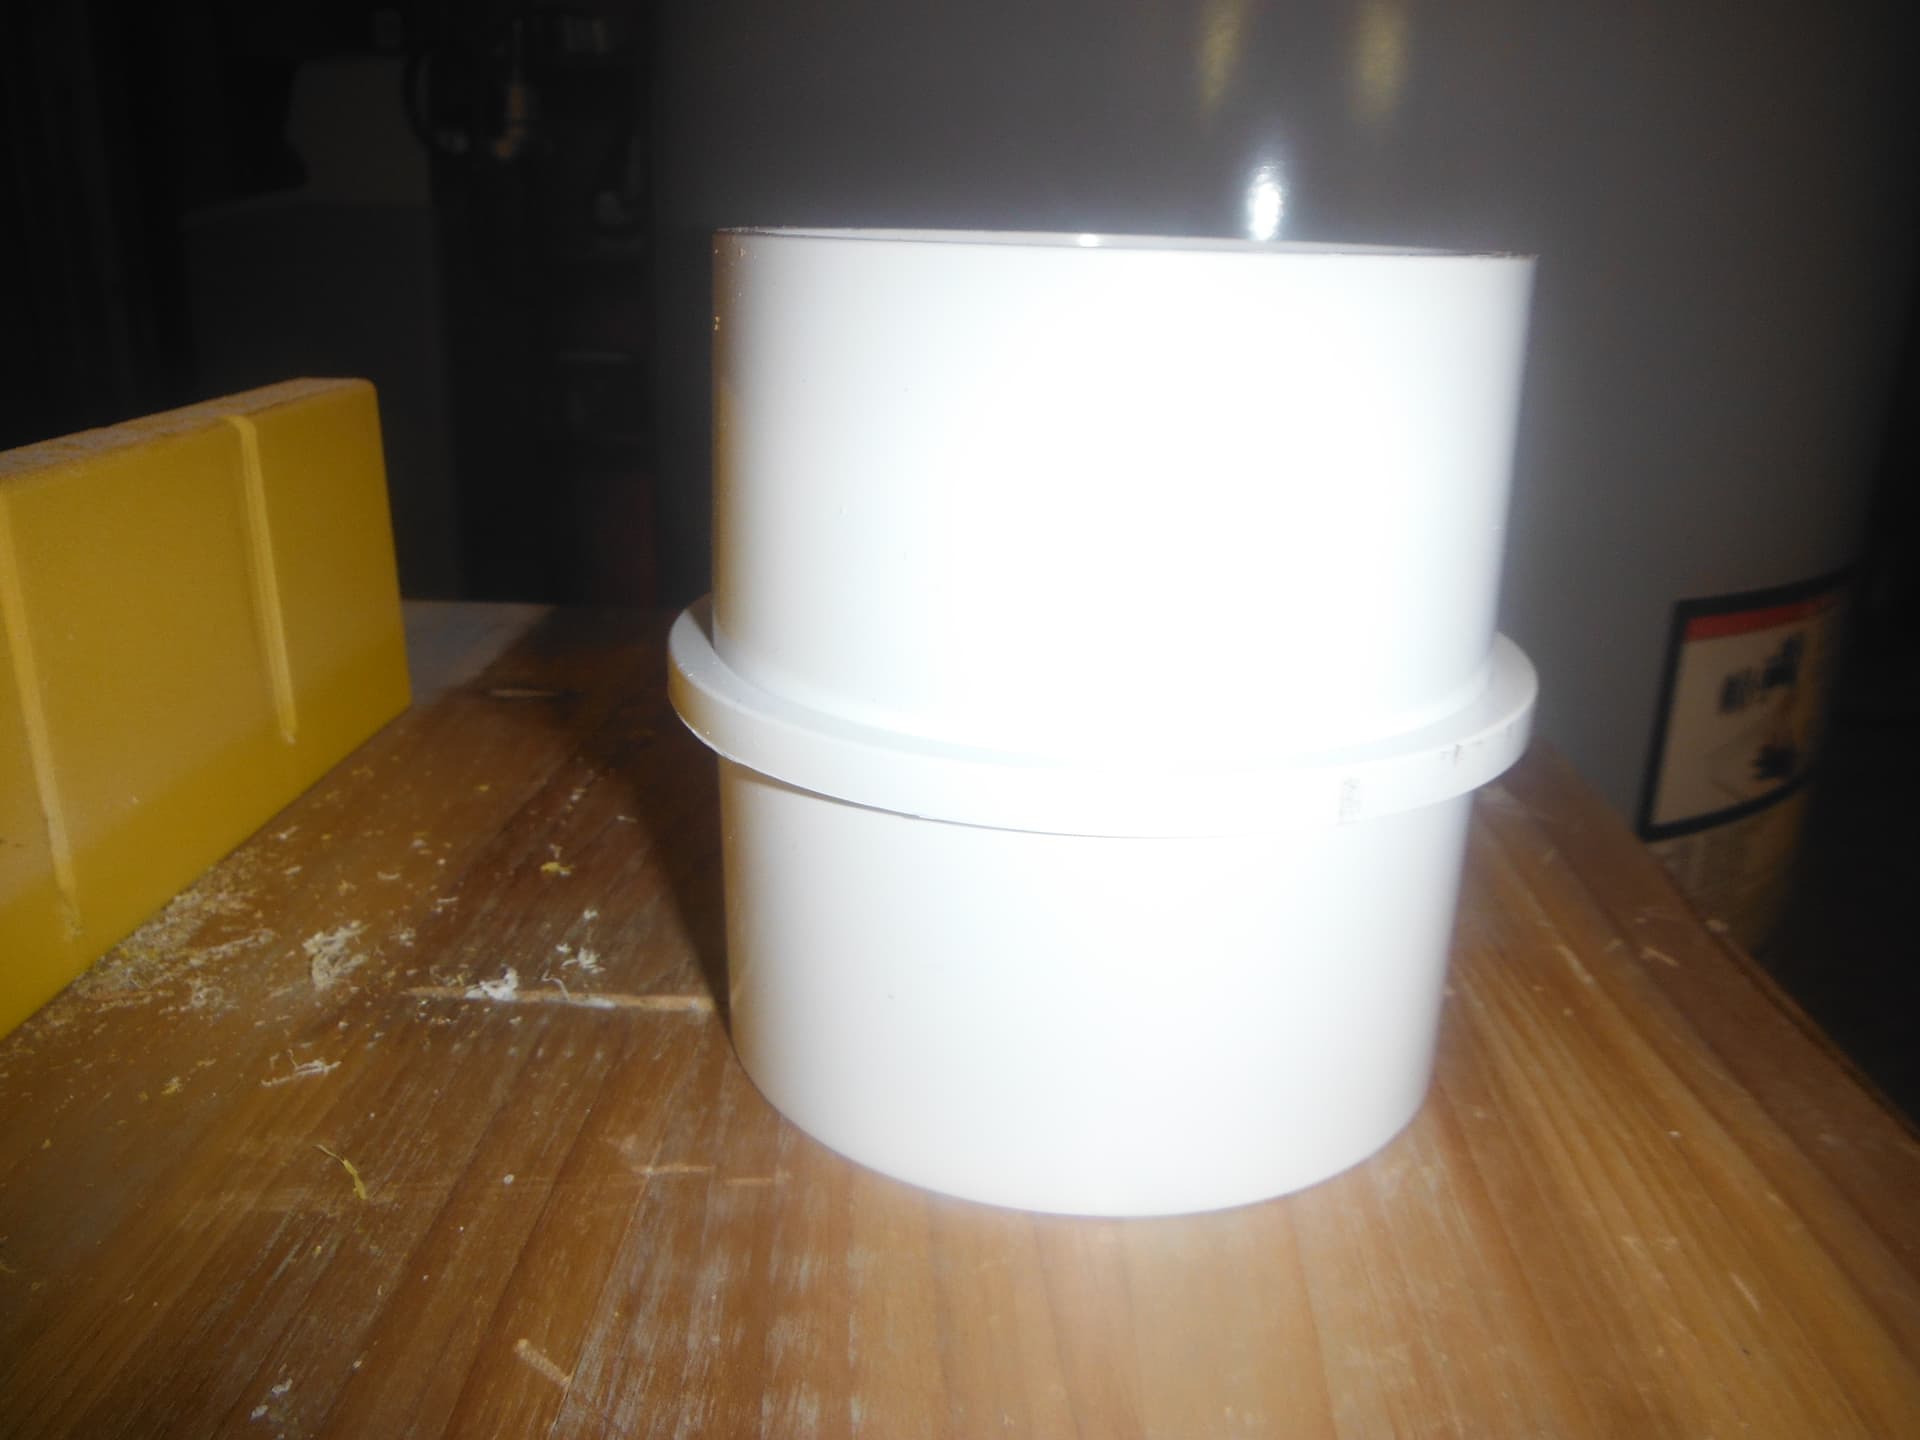
Here is the plan B setup using a short piece of 4" tube. I tested it to 30 ft with no leaks (my lake is only 30 ft deep).
End cap was made by cutting down an inline coupler and epoxying on a 1/4" plexiglass disk. The O-ring is 3/16". The strongback will place a limit on the number of penetrators. I’m hoping I can squeeze 8 in there. I am replacing the plexiglass end cap with aluminum. It is much easier to drill than plexiglass. The window side of the WTE will be plexiglass epoxied directly on to the tube. Cost should be about $60 for a completed WTE for shallow lake freshwater use.


Here are some pics of the final WTE end cap closure. A single 3/16" O-ring is compressed between the aluminum endcap and the tube end by a strongback. The O-ring seals on 3 sides. The O-ring sealing flange is made from a 4" inside PVC connector. The endcap is epoxied to the sealing flange. I had to make up a fixture to hold the sealing flange to allow sanding the connector OD for a looser fit inside the tube. Very little compression of the O-ring is required; just enough to seal at shallow depth. Then water pressure takes over and further compresses the O-ring. Progress.


