We at DeepWater Exploration are proud to introduce the exploreHD. This underwater HD USB camera will empower your ROV adventures due to its true color technology, sharpness, natural framerate(30fps), 400m depth rating, and fitting in the palm of your hand, among other practical features. Due to the nature of the camera ASIC encoding the video, up to three cameras may be easily connected to a small computer, such as a Raspberry Pi, with negligible video quality loss. We are currently in production of the first batch of exploreHD cameras and hope to expedite our production with more orders. Please see the link below for more information on our product and company!
I’m curious as to what the results are like at depth, where the colour loss is generally more significant than near the surface. Do you have any comparison images with ROV-provided light instead of bright natural light from above?
From what I’m aware the Sony IMX323 sensor is effectively equivalent to the IMX322 we use in our Low-Light HD USB Camera, so I imagine this has decent low-light performance, which it might be worth mentioning on your product page
Thank you for your reply! We have yet to test this at higher depths but since the camera itself uses AI and takes the surrounding into consideration in getting the best color, I assume it should be no issue. It is basically a more advance version of auto white balance that is trained for underwater. Given decent lighting, most likely from the Lumen Subsea Light , I believe it will be no issue.
We currently sell 2 models with the camera, one with the 6061 durable aluminum housing, which will allow this camera to be mounted at any angles of the ROV, and just the camera board itself for placing it in an electronic enclosure.
Since we wanted to keep it at a smooth 1/30 shutter speed in auto mode, the lowlight performance is slightly worse than the Low-Light HD USB Camera. However, you can manually adjust the camera to have low light compensation in the settings and the performance is similar in our testing.
We are currently figuring out a method to use OBS to record for high bitrate recording with minimal compression. Our goal with this camera is to replace the need for GoPro when recording ROV footage entirely as they can be inconvenient for ROV cinematography applications.
Thanks again and let us know if you have any questions!
Their Technical Data says the camera outputs a H264 encoded stream, so it should work by default as a replacement camera with the Blue Robotics companion computer software (just plug in and it streams to QGC). ArduSub itself is unrelated here - our camera streaming functionality is handled by the Raspberry Pi companion computer which streams the video directly to the top side. ArduSub is the firmware that runs on the Pixhawk autopilot board.
Note that at the moment we don’t have built in support for multiple simultaneous camera streams, and QGC also doesn’t support that. With a bit of work it’s possible to set up additional camera streams, which can then be displayed with something like OBS, VLC, or directly with gstreamer
We had the chance to test the camera in the ocean with our prototype ROV and provided a link to our channel with the video samples Let us know what you guys think.
Cool video! It was interesting to see the colour balancing updating live as the lighting and scene objects change.
I’d also be interested to see side-by-side comparisons of some other cameras (e.g. the standard BR Low-Light camera, and possibly a go-pro or similar) to get a better idea of exactly how yours is different. Of course any comparison is likely to be limited (e.g. users could generally tune the settings of any camera to be better than its default setup if they’re operating in a consistent environment), but if the adaptability is a strong-point of your camera then you could perhaps showcase a few different operating conditions (e.g. day/night/murky water), which would hopefully show that yours performs consistently well without needing user tuning
I’ve updated your comment so it includes the video link directly, rather than as a hyperlink, so the video gets embedded and we can watch it from within the forum
Thanks for your response! Getting a side by side with the standard BR Low Light Camera can be a bit challenging as our current ROV does not support a dome cap and recording simultaneously is a challenge. When we have the chance, we can compare it more to GoPro in a controlled environment.
While the settings you mentioned can be tuned, it is limited to only slight changes to the Kelvin of the color temperature and not much more. We have tried in the past with these settings but it’s too limited as to get accurate colors as each RGB values’ saturation and hue needs to be adjusted manually to get the same result as the exploreHD. Users could try to tune it in color grading software such as Premiere or Da Vinci Resolve to get more control of the color but unless they are able to record at high bitrate with high color depth of at least 10 bit and have color charts in their photos, it is unachievable. This is why we aim to get the best color straight out of the camera and it is due to our image processor, with our advanced color imaging technology, which allows us to achieve these results. So far with the USB cameras we’ve tested we have not seen anything like it. We have compared it in air, however, with different lighting environments as those are the environments we can more consistently test. Even with in air comparisons, the exploreHD stands out as producing the most accurate colors.
The specialty of this camera, other than the small form factor and is in its own housing, is its ability to adapt with our image processor. During the video there were scenes of it in the sun and depth that ranged from 5 feet all the way to around 30-40 feet, both in direct sunlight or in the shade. None of the settings needed to be adjusted manually. The water shown in the video is also quite murky, providing ample opportunity to really stress test the camera. We will release a technical video soon in a few days talking more about the camera specifications and showing the comparisons.
I understand the benefits you’re trying to provide - I’m trying to help you present them in a way that allows other potential users to see those benefits, so they can make educated purchasing decisions
Imagine someone wants to buy their first ROV camera - why would they choose yours? You provide descriptions about the processing that you’re doing, and sample images with seemingly decent colours, but without a point of comparison it’s difficult to know if they were just ‘taken in good conditions’, or if ‘your processing makes otherwise poor conditions manageable’ (ie your camera has a broader range of ‘acceptable conditions’ than alternatives tend to, which is a great selling point).
The GoPro comparison images were a good starting point for this, but because they’re all taken near the surface in clear water and with decent lighting it’s unclear whether they could be easily fixed with some colour temperature adjustment/‘better settings’.
Part of my point was that this would be a lot more obvious if there was a ‘normal’ stream to compare it to. As is the video looks quite clear for most of it, but for inexperienced people looking at it it’s not obvious whether that’s just because it was clear water and decent lighting conditions, or if the camera is managing to provide high quality and usable footage from what would normally be quite difficult viewing conditions.
The best user experience is one that ‘just works’, and it seems like that’s what you’re trying to provide (and quite possibly succeeding at it). Unfortunately such a seamless experience can make it seem like maybe every camera is like that, which is why I’m suggesting a direct comparison would be useful, to highlight how much benefit (in both quality and ease of use) your processing is actually providing
I’m keen to see this when it’s released - keep up the good work, the product is looking promising and exciting so far
Thanks for your response and suggestion! There seems to be a bit of confusion, the purpose of that video is just to show what our camera is capable of in average conditions that people would encounter when using the ROV for photography/videography. The technical video will go much more in depth with how our camera stands out in the crowd
As in terms of comparisons, the technical video will also cover that. We will show how the color science and sharpness of the camera stands out to other USB cameras in the market.
Image quality aside, this camera stands out on itself in terms of specifications. GoPro’s or separate dedicated ROV cameras shouldn’t be in the same category as the exploreHD stand out in price, size, depth rating, ease of use with an ROV, etc. All this would of course be addressed in the technical video
Now, we do sell a model of the exploreHD without the housing called the HDcam, meant for use in an electronic enclosure with a dome cap. It features a different lens optic to compensate for the different lens distortion compared to a flat glass port. That camera is more comparable with the BR Low-Light camera or other USB cameras in the market so the video will discuss about how ours is different.
We just finished with the technical video. Unfortunately we had limited access to the pier so we weren’t able to get all the footage we wanted but we tried making our best compromises The video will explain a lot more about the camera and its operation.
Just a quick update on the camera. We finished developing the controls for the camera for Linux. Using this, you would be able to fine tune the camera’s bitrate in all recording formats. You can change how H.264 compression is done such as GOP settings, iframe, vairable/fixed bitrate, etc. This will allow you to fine tune the camera for the best quality while keeping the bitrate as low as possible.
We are currently adding this to the Ardusub companion that will allow you to get the best video quality for ArduSub systems.
Cool! If you’re able to add it in a non-destructive way (ie it doesn’t prevent the existing ‘normal’ functionality from working as intended, including when your camera isn’t connected), then feel free to make a PR and we might be able to add it to the main companion repo
Thank you so much! That will help out a lot. The addition should be non destructive. We just have to run an executable and add a few lines of code to video.sh so it would auto start.
Right now we are trying to add custom sliders on the GUI for customers to change the settings with our camera. We will let you know when its done
Hello everyone! Its been over a month since we first introduced the idea of a USB camera designed specifically for ROV application with its own separate housing. We wanted to follow up with some of the updates we made since then before shipment. The exploreHD will now features a fish eye lens with a slightly wider FOV than GoPro at an angle of approximately 150 Degrees Diagonal in water. The whole housing itself will now be anodized preventing risk of oxidation from galvanic corrosion.
We been working hard on fine tuning the colors on the camera but since the software is in beta, you now have an option to disable it with UVC camera controls by turning off automatic white balance.
We updated the manual and the github to offer clear written instructions on how to install the camera drivers!
We should be ready to ship these pretty soon but we want to make sure we are offering the best quality cameras before shipment. Let us know if you have any questions!
I’m assuming this is accounting for the refractive index of both the case and the water (e.g. you measured the FOV with the assembled camera in water)?
Since FOV is not commonly measured in water, and also often written as separate horizontal and vertical components, it could be useful if you provided some direct comparison numbers
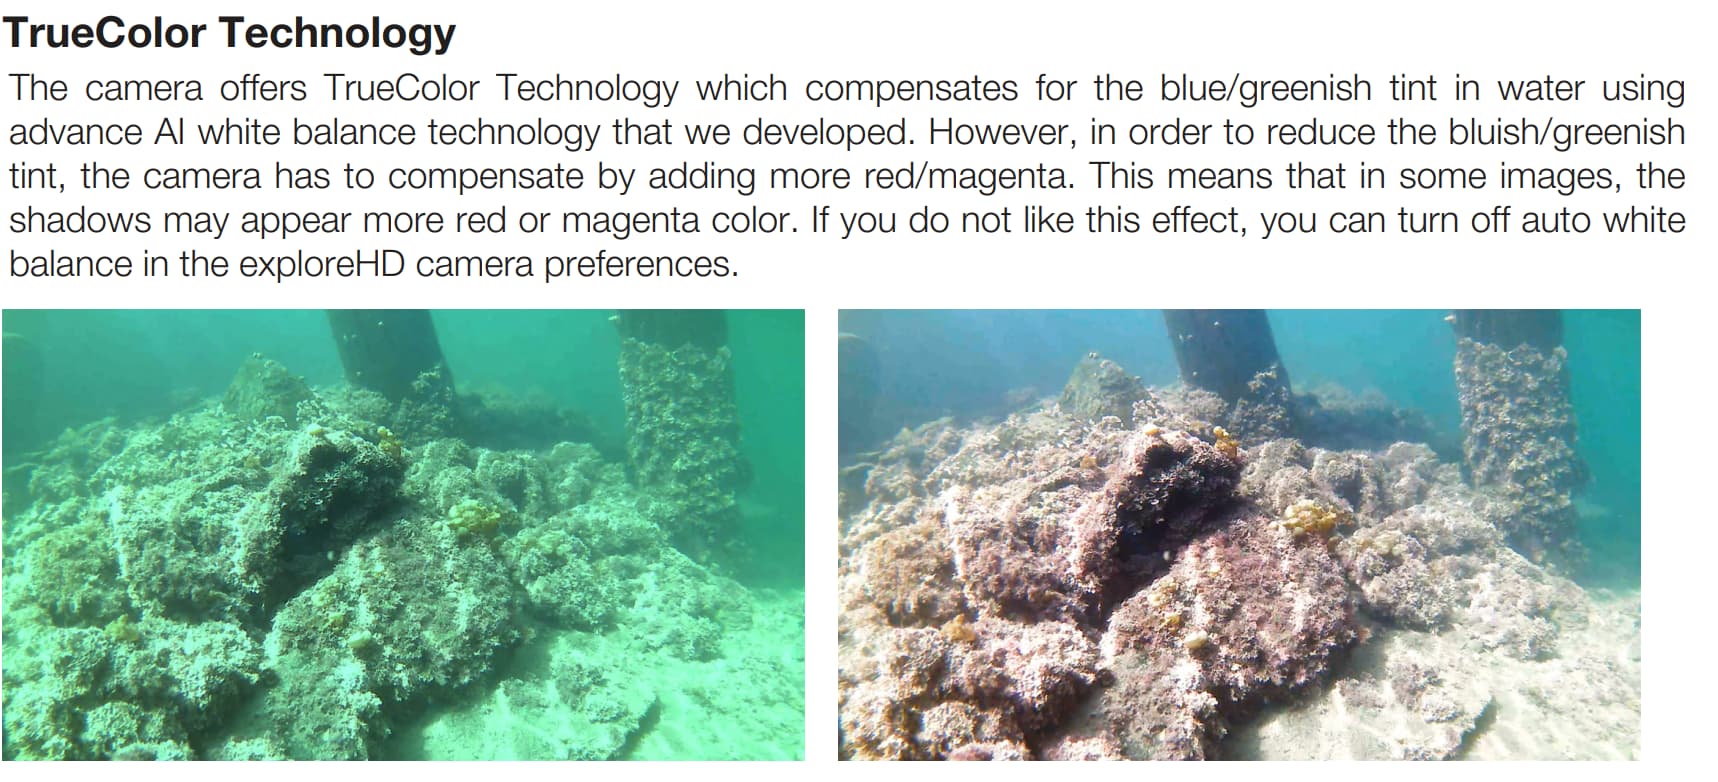
Given you’re doing color correction/compensation, it might be clearer/better marketing to describe it as that, instead of as “AI white balance”.
Saying “white balance” makes it seem (to me at least) like you’re just shifting the hue of the whole image so that white things appear white, but for a photo like the green one in the left of your image that would normally come up as still quite washed-out (see example below), whereas your improved result tries to restore/put back some of the colours that would normally be seen with the naked eye (if there was no water).
As a point of interest, are ‘normal’ camera settings applied before or after the AI processing occurs? I’m assuming exposure has to be applied beforehand (since it directly influences the image capturing process), but I’m unsure on others like brightness/contrast/saturation/etc. (or perhaps they’re not available with this camera?)
In case anyone is interested, here’s a comparison image with manual white-balance/hue-shift correction, and the basic visibility improvement code I discuss in this comment:
Sorry for the delayed response been busy trying to get these cameras to customers Yes the FOV is considering the refractive index of water, we used checkerboard and openCV to measure the FOV. Exposure is applied first before the AI coloring process. We did notice that on some of our first runs with the software, sometimes it could be overexposed so we will be releasing a firmware update soon that fixes that issue.
We are working on software that continuously updates the camera performance. Our new camera’s firmware will allow the exploreHD camera to be plug and play with ArduSub Companion. It will automatically apply recommended H264 settings for the RPI setup including bitrate and GOP settings, no need for modifications or driver installation. Of course, if you want to tinker with those settings, you can still install our driver on the Pi and experiment around
Current customers of the exploreHD will also be able to update their camera as soon as we release the new firmware to the public! The update just requires the exploreHD camera to be plugged in to any Windows OS PC.
We also made a new ad for the exploreHD, linked below!
Thanks again and let us know if you have any questions!
Interesting - will those improvements be happening while the camera is running? I’m intrigued as to which metric(s) you’re using to determine what counts as ‘better’ performance for the camera to try to achieve, although that’s perhaps not something you’re able to share.
Since the AI Color correction is still in Beta and in the future we may have better recommendation for H264 streaming options, these are the settings that I mean by better in terms of performance. We can constantly release new firmware for the exploreHD that improves efficiency of streaming (hence quality) and better color science.


")